Photos are precious possessions. For various reason photos may become dull, lack contrast, or have a color cast. You can fix the problem by adjusting the shadows, midtones, and highlights. In this tutorial, you’ll learn how to adjust or High End Retouching
and tonality of an image in very impressive but easy ways.
Original Image
Image with color and tone correction
Let’s get started……
1.Assess your original image
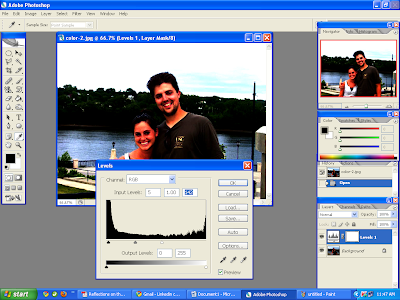
2. Work in the Levels of New Adjustment Layers
Select the Layer option, go New Adjustment Layer and then hit Levels. A new dialog box will pop up named levels. Working in an adjustment layer rather than directly with the image leaves the original image untouched as if you can get rid of your changes and restore the original image at any time.
This histogram dialog box show the image graphing the number of pixels at each intensity level. Different images may have different graphing.
3. Move the sliders for getting a good contrast
Now, drag the black point input slider and the white point input slider (the black triangle and white triangle located directly beneath the histogram) inward toward each other until you can have a bright and color contrast look of the image. After you adjust the sliders, the image will have more contrast.
4. Adjust the Midtone
Hitherto, we have moved the two extreme left and right input sliders. We will now move the middle input slider (the gray triangle below the histogram) which adjusts the gamma, or contrast, of the midtone values. Drag the middle input slider to the left to lighten the image or to the right to darken the image. It changes the intensity values of the middle range of gray tones and gives a more contrastive brightness quite naturally.
5. Neutralize the color
Select the Set Gray Point Eyedropper tool in the Levels dialog box (the middle eyedropper). Then click an area in the image that should be gray. That area becomes neutralized in gray, and the color cast is removed.
6.Get the final image and enjoy
After making all the adjustments, click OK. Voila! You have got your image with color and tone retouch
Learn Where to Apply this Tutorial:
·
Picture taken by a professional photographer does not necessarily mean his pictures are ready for publication or flawless.
· Products and service can be best highlighted and presented through the image color and tone where needs correction or altering the color.
Who needs this service?
·
This masking tutorial is not just for individual purpose. In the commercial field this process of is of great use. Those web and prepress graphics company want to ease their workloads and spend their valuable time in other creativity can outsource this.
·
Online retailers, digital photographers, digital artists, magazine and newspaper publishers, graphics designers, webmasters, advertizing agencies need this astronomically.
Tradexcel Graphics Ltd (TGL) (http://www.tradexcelgraphics.com) is the most skilled and famous outsourcing company to accomplish the bulk amount of image color and tonality correction solution, making image vivid and live, removing dirt and marks from image, color adjustment and many more for 100% quality and cost effective way. So, if you have more files piled up to execute such image editing task take help from us to ease your burden and promote your products. Click TGL for more information in our website.


